
The single most important thing you can do before starting a Florida remodel is seal and protect your building envelope — roof, flashing, windows, doors, and drainage — and coordinate those upgrades with permits and project timing before a single wall comes down. Everything else flows from that decision.
Here is a quick starter checklist you can act on today or hand directly to a contractor:
Pro Tip: If your project runs from May through November, plan all exterior envelope work for the early weeks of the schedule. A half-open roof or unsealed wall penetration during a tropical storm can set a project back by months.
Sealing the building envelope — roof, flashing, windows, doors, and drainage — and aligning those upgrades with permits and project timing is the single most important preparation step for any Florida home remodel.
| Point | Details |
|---|---|
| Seal the envelope first | Prioritize roof, flashing, WRBs, and drainage before any interior work begins. |
| Schedule around storm season | Plan exterior work for December through April; add a 20–30% buffer for permit and weather delays. |
| Choose moisture-resilient materials | Specify porcelain tile, LVP, cement board, and moisture-resistant drywall for all wet-risk areas. |
| Verify permits and product approvals | Confirm Florida Product Approval numbers for impact products and check contractor licenses at myfloridalicense.com. |
| The Kitchen, Bathroom & Flooring Store | Offers full-service kitchen, bathroom, and flooring remodels in Jacksonville with climate-appropriate product selection and professional installation. |
Start by separating your scope into two tracks: envelope work (roof, windows, doors, drainage, exterior walls) and interior finishes. Envelope work is weather-sensitive and permit-heavy, so it goes first. Interior finishes can flex around it.
Florida remodel permit timelines vary by county, but most residential permits take two to six weeks for review. Build that window into your schedule before you commit to a contractor start date.
Hurricane season runs June through November. Large exterior projects — roof replacements, window installations, additions — are best started in December through April when you have the widest weather window. If you must start during season, have a written storm-response plan with your contractor that covers tarping, tie-downs, and material storage.
Pro Tip: Order long-lead items — custom cabinetry, impact-rated windows, engineered countertops — the moment your permit is submitted, not after approval. Lead times for impact products in Florida can stretch 8–14 weeks during busy season.
Coordinate deliveries so materials arrive as close to installation day as possible. Porous materials like drywall and hardwood left on a job site for days in Florida humidity absorb moisture before they are ever installed.
Containment is not optional in a Florida remodel. Dust, debris, and open wall cavities during demolition create direct pathways for humid air and mold spores into finished areas of your home.
Follow these steps before demo begins:
For material staging, keep these rules in mind:
Before demo day, walk the exterior with your contractor and secure or remove any loose outdoor items — furniture, planters, decorative shutters — that could become projectiles if a storm moves through during your project window. A mid-project tropical storm is not unusual in Florida, and a few minutes of prep prevents real damage.
Moisture control starts at the building envelope, and the Florida Building Code’s moisture prevention guidance is clear: buildings should be designed to provide healthy relative humidity levels and to prevent liquid water and water vapor migration through construction details like water-resistive barriers (WRBs), flashing, vapor and air barriers, and proper HVAC design.
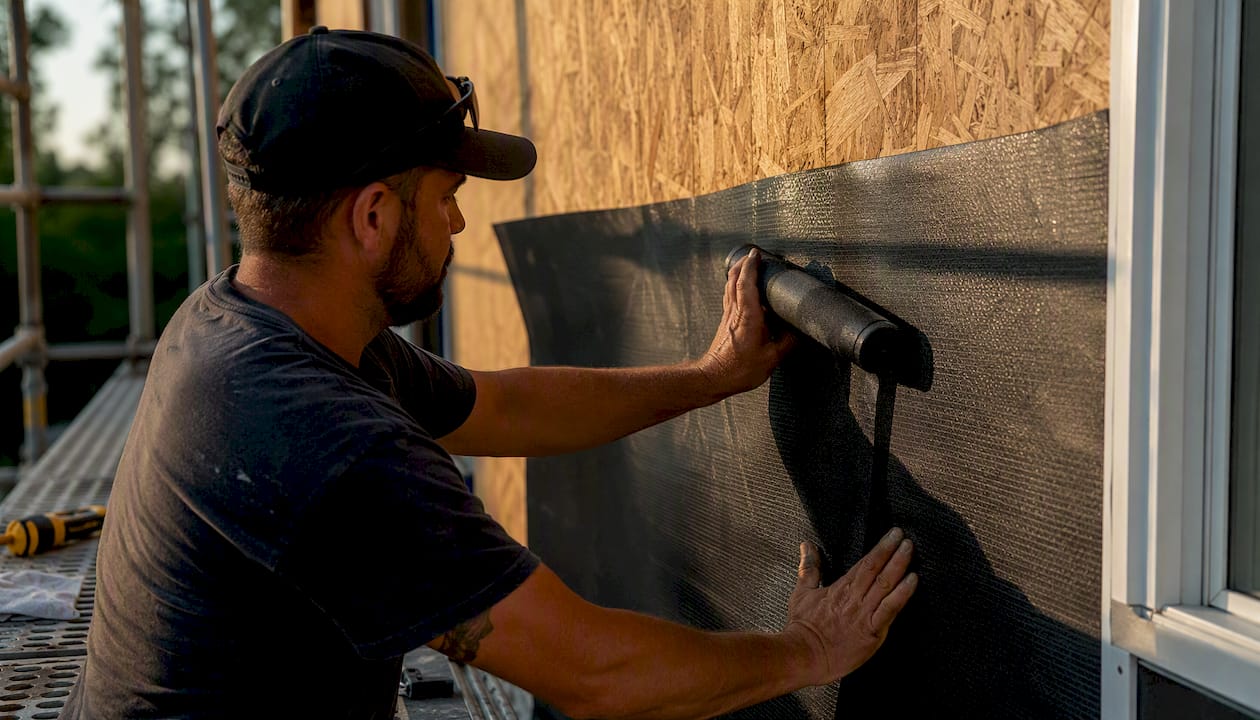
Chapter 14 of the 2023 Florida Building Code establishes the minimum requirements for exterior walls, including WRBs, flashing, drainage planes, and condensation protection. These are the baseline your contractor must meet — not suggestions.
Practical measures to require in your remodel scope:
For flood-risk properties, check your FEMA flood map before finalizing your scope. If your home sits in a Special Flood Hazard Area, discuss foundation type and freeboard (the height above base flood elevation) with a licensed engineer. Specify moisture-resistant subfloor assemblies and wall systems rated for wet exposure in any low-elevation areas.
Pro Tip: Ask your HVAC contractor to perform a Manual J calculation that includes a latent load analysis — not just sensible heat. Florida’s humidity load is often the bigger challenge. Specify secondary drain pans with float switches on all air handler units in conditioned space. A clogged primary drain during a humid August can cause ceiling damage that rivals a roof leak.
For humidistat settings and latent-load control specific to Florida homes, a properly calibrated humidistat keeps indoor relative humidity between 45% and 55%, which is the range that discourages mold growth without over-drying the space.
The University of Florida’s material design guidance recommends prioritizing moisture-resistant sheathing, polymer-modified bitumen membranes, self-adhering flashings, moisture-resistant wallboard, and moisture-tolerant flooring options like porcelain tile and luxury vinyl plank. That guidance shapes every recommendation below.
Use membrane protection and capillary breaks between the slab and any wood framing. In flood zones, discuss foundation type with a licensed engineer — elevated pier or stem-wall foundations with proper venting reduce moisture exposure significantly.
Fiber cement siding, stucco over a properly installed WRB, and engineered wood products with factory-applied coatings all perform well in Florida’s humidity and UV exposure. Avoid untreated wood sheathing without a protective membrane behind it. Every cladding system needs proper flashing at all transitions, windows, and penetrations per FBC Chapter 14.
Hip roofs outperform gable roofs in high-wind events because they present a smaller surface area to wind pressure. Metal roofing and concrete tile both offer strong long-term performance in Florida; asphalt shingles are acceptable but require a secondary water barrier underlayment. High-wind fastening patterns — closer nail spacing and ring-shank nails — are worth specifying beyond the code minimum.
Any replacement window or door requires a permit and a Florida Product Approval number. In Wind-Borne Debris Regions (WBDR), impact-rated glazing or an approved shutter system is required. Beyond-code measures like improved roof-to-wall connections and secondary water barriers reduce storm damage risk meaningfully, especially in coastal properties.
Porcelain tile and luxury vinyl plank are the two strongest choices for kitchens, bathrooms, and any room with flood or moisture exposure. Both handle humidity, standing water, and temperature swings without warping or delaminating. Solid hardwood flooring is beautiful but should be avoided in flood-exposed zones or on slab foundations without a proper moisture barrier and acclimation protocol.
| Material | Moisture Resilience | Wind/Impact Resistance | Best Use |
|---|---|---|---|
| Porcelain tile | Excellent | N/A (interior) | Kitchens, baths, entries |
| Luxury vinyl plank (LVP) | Excellent | N/A (interior) | Living areas, bedrooms, baths |
| Fiber cement siding | Very good | Good | Exterior walls |
| Metal roofing | Excellent | Excellent | Roof replacement |
| Impact-rated glass | Good | Excellent | Windows and doors in WBDR |
| Cement board | Excellent | N/A (interior) | Wet-area wall backer |
Resolve permits and HOA approvals before any work begins — not concurrently. A contractor who starts work without a permit creates liability for you as the homeowner, and HOA violations can require expensive reversals.
Step-by-step permit process:
The FBC’s product approval system and location-specific designations like the High-Velocity Hurricane Zone (HVHZ) and Wind-Borne Debris Region (WBDR) create requirements that vary by address. A window approved for one zone may not be approved for another. Confirm your property’s designation early.
HOA checklist:
Required permit documents (typical):
The right contractor for a Florida remodel understands the FBC, knows how to detail a proper WRB and flashing system, and has installed impact-rated products before. Those are not optional skills here.
Interview questions to ask every candidate:
Verification steps:
Red flags:
Contract essentials:
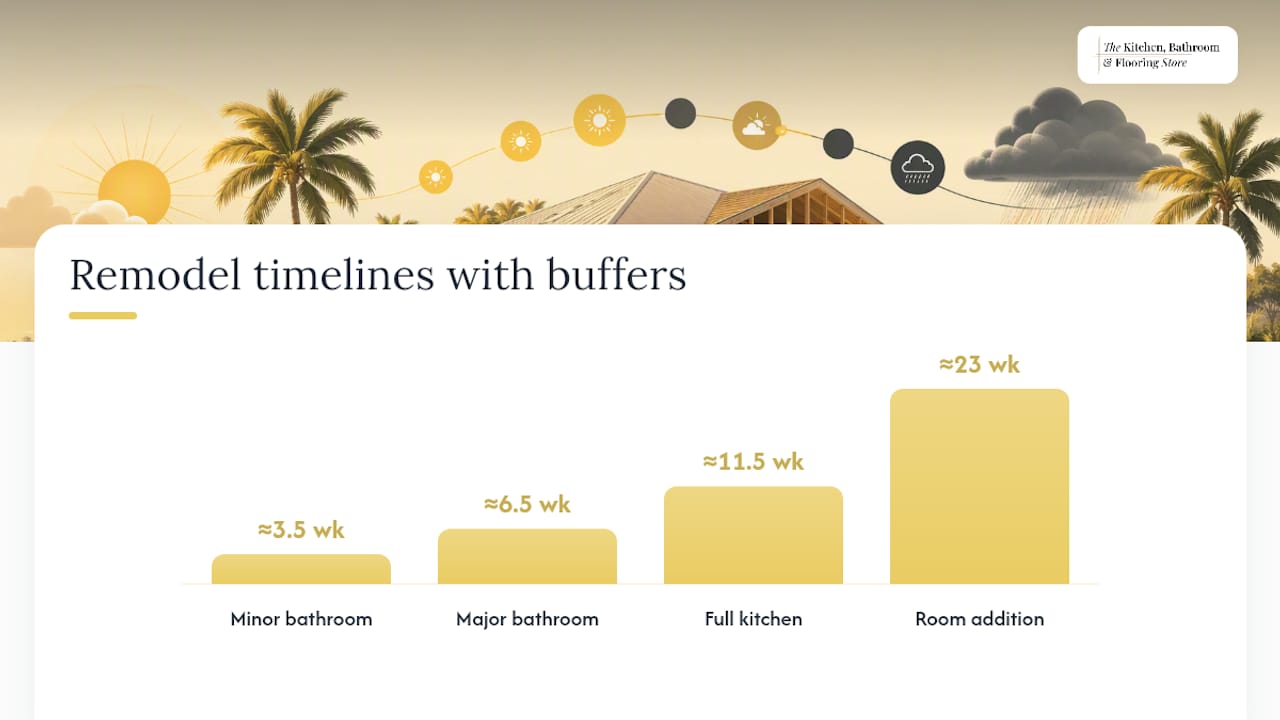
Budget and timeline planning for a Florida remodel requires building in two layers of contingency: one for permit and inspection delays, and one for weather interruptions during hurricane season.
Timeline with recommended buffers:
Budget line items to plan for:
A phased payment schedule protects both you and your contractor. A reasonable structure ties payments to completed, inspected milestones: permit issuance, rough-in completion, envelope closure (roof and windows sealed), and final inspection. Avoid front-loading payments before critical envelope work is complete. If a storm interrupts the project mid-construction, your homeowner’s insurance policy may cover some damage — confirm this with your insurer before work begins, and ask your contractor whether their general liability policy covers in-progress work.
For HVAC design considerations that affect your budget, properly sized equipment for Florida’s latent load often costs more upfront but reduces energy bills and repair costs over time.
Kitchens and bathrooms are the two rooms where moisture damage is most likely and most expensive. A few hours of prep before demo begins can prevent weeks of remediation later.
Kitchen pre-remodel checklist:
Bathroom pre-remodel checklist:
Long-lead items to order early:
A full-service remodeling partner simplifies the climate-risk equation considerably. When design, product selection, and installation are coordinated under one roof, the gaps where moisture problems typically hide — mismatched products, uncoordinated installation sequences, missing product approvals — get closed before they become problems.
The Kitchen, Bathroom & Flooring Store manages the full project arc for kitchen, bathroom, and flooring remodels in Jacksonville, Saint Johns, and Duval counties:
Choosing moisture-tolerant interior finishes and specifying the right installation details from the start meaningfully reduces long-term repair and mold costs compared with standard materials — and the difference shows up most clearly in Florida’s climate, where humidity and storm exposure test every material choice year after year.
Most homeowners planning a Florida remodel focus on the visible upgrades — new cabinets, fresh tile, updated fixtures — and treat the envelope and moisture systems as the contractor’s problem. That framing is where projects go sideways.
The building envelope is not a line item to value-engineer. A secondary roof water barrier costs a fraction of what a post-storm interior remediation costs. Proper flashing at a window opening takes an extra hour to install correctly and prevents years of slow water intrusion that shows up as mold behind drywall long after the contractor has moved on.
The other thing homeowners consistently underestimate is the HVAC latent load. Florida’s outdoor air carries enormous amounts of moisture, and a system sized only for sensible cooling will run constantly without ever bringing indoor humidity to a comfortable level. The result is a house that feels clammy at 74°F and grows mold in closets. A Manual J calculation with a proper latent analysis is not an upgrade — it is the baseline for any Florida remodel that includes HVAC work.
One non-obvious item worth flagging: stainless steel or marine-grade hardware throughout the kitchen and bathrooms in any coastal property. Standard zinc or chrome hardware corrodes within two to three years in salt-air environments, and replacement is a nuisance cost that adds up. Specify the right finish once, and you will not think about it again.
The Kitchen, Bathroom & Flooring Store gives Jacksonville-area homeowners a single, coordinated path from design to installation for kitchens, bathrooms, and flooring — with product selections chosen specifically for Florida’s humidity, heat, and storm exposure.

Every project starts with a personalized design consultation where we help you select materials that meet both your aesthetic goals and the practical demands of the Florida climate. From moisture-resistant flooring to properly specified bathroom tile and cabinetry, we handle the details so you do not have to coordinate between multiple contractors. Financing options are available to help you invest in the climate-resilient upgrades your home needs without stretching your budget all at once.
If a bathroom remodel is on your list, our bathroom remodeling packages are designed for exactly this kind of turnkey, climate-aware project. Contact us to schedule your consultation and get a detailed estimate built around your home’s specific needs.
These are the primary resources to bring to contractor meetings and permit review conversations when planning your Florida remodel: