
For most kitchens, knobs go 2.5" to 3" from the door corner, pulls center on the stile about 3" to 4" from the rail, and drawer pulls center on the face with a length near one-third the drawer’s width. Test every mark with removable putty before you drill, and use a jig or template so each door and drawer matches its neighbor exactly.
TL;DR:
- Most cabinet hardware is best placed with knobs 2.5 to 3 inches from the door corner and pulls 3 to 4 inches from the top rail of stiles.
- Use a jig or template to ensure consistent center-to-center measurements for pulls, typically 1/3 of the drawer width, to avoid misalignment.
- Measure from the inside stile edge on Shaker doors and from the outer edge on slab or full-overlay doors for accurate placement.
- Long D-shaped pulls are recommended for accessibility needs, and placement should prioritize comfort and clearance over exact symmetry.
- Professional remodeling services include on-site clearance testing and installation to prevent misplacement and collision issues.
Knobs use a single screw and a small footprint. Pulls use two screws spread across a bar, which gives you more leverage when your hands are wet, full, or arthritic. That mechanical difference should drive most of your decision, not just looks.
Knobs work best on upper cabinet doors, where you’re mostly pulling downward and a light grip is enough. Pulls make more sense on lower cabinets and drawers, where you’re often tugging against gravity, food weight, or a stuck drawer track. A lot of kitchens mix both: knobs upstairs, pulls down low. That’s not indecision; it’s a genuinely functional split.
Visual weight matters just as much as function. A row of small knobs across upper doors reads as light and airy. Switching to bar pulls throughout the whole kitchen, upper and lower, creates a heavier, more linear look that suits Shaker and slab doors especially well. If you’re chasing a specific style, ask what silhouette you want the eye to follow across the room before you pick hardware piece by piece.
Accessibility deserves its own conversation, and NKBA planning guidance treats it as a real design factor, not an afterthought. If anyone in the household has reduced grip strength, arthritis, or uses a wheelchair, D-shaped pulls with a longer bar are far easier to hook a hand or forearm through than a round knob. Length matters here too: a 5-inch pull needs less precise aim than a 1-inch knob when your fine motor control isn’t perfect.
Here’s how the choice usually breaks down in practice:
Pro Tip: If you’re on the fence, buy one knob and one pull in your finish before ordering a full set. Hold each one the way you’d actually grab it mid-cooking, hands slightly greasy, and see which one you’d rather deal with fifty times a day.
Your reference point for measuring shifts depending on how the door is built, and getting this wrong is one of the fastest ways to end up drilling into a hinge or a rail instead of solid wood.
Shaker doors have a visible frame, called a stile, around a recessed or flat center panel. You measure from the inside edge of that stile, not the outer door edge, and you center the pull on the stile’s width so it doesn’t look off-kilter against the panel behind it. This is the most forgiving style to work with because the frame gives you a built-in guide.
Slab and full-overlay doors have no frame at all, just one flat surface, so you measure from the outer door edge and keep that offset identical on every single door. There’s no stile to anchor to, which means your jig setting has to be exact and consistent, because there’s no visual frame to hide a small error.
Inset doors sit flush inside the cabinet box rather than overlapping it, with a narrow reveal gap around the edges. Doors For Pros recommends pulling that offset in tighter, around 2" to 2.5" from the corner, and physically checking that the knob or pull won’t strike the face frame or an adjacent door when everything’s closed. The reveal on inset doors is often less than 1/8 inch, so there’s almost no room for error.
Frameless (European-style) cabinets skip the face frame entirely, so edge pulls become a common choice. These mount along the top or bottom edge of the door rather than the face, and placement is centered side to side on that edge:
The industry numbers are consistent enough that you can treat them as a starting template for almost any kitchen, then adjust only when a specific door gives you a reason to.
For knobs, common professional practice places them 2.5" to 3" from the corner of the door. On upper cabinets, that means the bottom corner closest to where your hand naturally reaches up. On lower cabinets, it flips: you measure from the top corner, since that’s the corner nearest eye level and easiest reach when the door is open below the counter.
For pulls mounted vertically on a stile, aim for 3" to 4" from the top rail on upper doors, and 3" to 4" from the top rail on lower doors as well, keeping the pull centered left to right on the stile’s width. That consistency, same rail distance regardless of upper or lower, is part of what makes a kitchen’s hardware read as intentional rather than randomly placed.
Here’s the sequence that keeps you from second-guessing every single door:
Vertical orientation is standard for door pulls, running parallel to the stile. The exception is very wide doors, like a single pantry door or an oversized cabinet front, where a horizontal pull sometimes reads better and gives a stronger two-handed grip on a heavy swing. If a door is wider than about 24 inches, it’s worth mocking up both orientations with putty before committing.
Crown molding and tight ceiling clearance can also force a deviation. If your upper cabinets run right up against crown trim, a knob placed at the textbook 2.5" to 3" from the top corner might actually land under the molding’s shadow line or too close to the edge for a comfortable grip. In that case, drop the placement down slightly, sometimes as little as half an inch, until your fingers clear the trim without straining. The same logic applies to appliance panels on integrated refrigerators or dishwashers: match the panel’s hardware height to the surrounding cabinetry as closely as you can, but never sacrifice a clean grip just to hit a number on paper.
Pro Tip: When a run of upper cabinets sits below crown molding, install and test the end cabinets first. If both ends clear the trim comfortably, every door in between will too, since they share the same height.
This is really the core tension in cabinet hardware placement: the numbers give you a reliable starting point, but NKBA guidance is explicit that comfort and clearance should win over rigid symmetry whenever the two conflict. A door that’s technically measured to the standard but bangs into the toaster every morning was measured wrong, whatever the tape says.
Drawer hardware is more forgiving to plan than doors because there’s usually no rail or stile to negotiate. You’re centering on a flat, unbroken face, both horizontally and vertically.
Center every standard drawer pull left to right and top to bottom on the drawer front. That’s the rule almost without exception, since a drawer face rarely has a frame element that would justify pulling the hardware off-center the way an inset door might.
The trickier part is choosing pull length, and this is where the 1/3 rule earns its reputation as the most useful shortcut in this entire topic. Pick a pull whose overall length is roughly one-third of the drawer front’s width. A 15-inch-wide drawer front looks balanced with a 5-inch pull. A 24-inch-wide drawer front suits an 8-inch pull. Go much shorter and the hardware looks stranded in a sea of empty wood; go much longer and it can start to feel oversized for the drawer it’s on.
Wide drawers, the kind you find under a cooktop or as a single oversized utensil drawer, need a different approach entirely. Two options work well:
Neither choice is wrong. It comes down to whether you want one clean visual line or a more deliberate, repeated pattern across a wide front.
Stacked drawers, the kind you see in a bank of three or four under a counter, need a slightly different mindset. Each pull still centers on its own drawer face, but the goal is rhythm across the whole stack: same pull style, same length, same vertical centering logic on every drawer, top to bottom. A single misaligned pull in a stack of four is far more noticeable than one slightly-off knob among a dozen upper doors, simply because your eye reads a vertical stack as one continuous object.
Center-to-center is the only measurement that matters when you’re buying hardware or setting up a jig, and confusing it with a pull’s overall length is the single most common mistake homeowners make on this project.
Center-to-center, often written as “c-to-c,” is the distance between the two screw holes on a pull. It has nothing to do with how long the pull looks on the shelf. A pull can have a dramatic 6-inch overall length but only 3-3/4 inches of c-to-c spacing if the bar extends past the mounting points on each end. Kreg’s own product guidance is blunt about this: always drill to the c-to-c spec, never the total length, or your holes won’t line up with the hardware you bought.
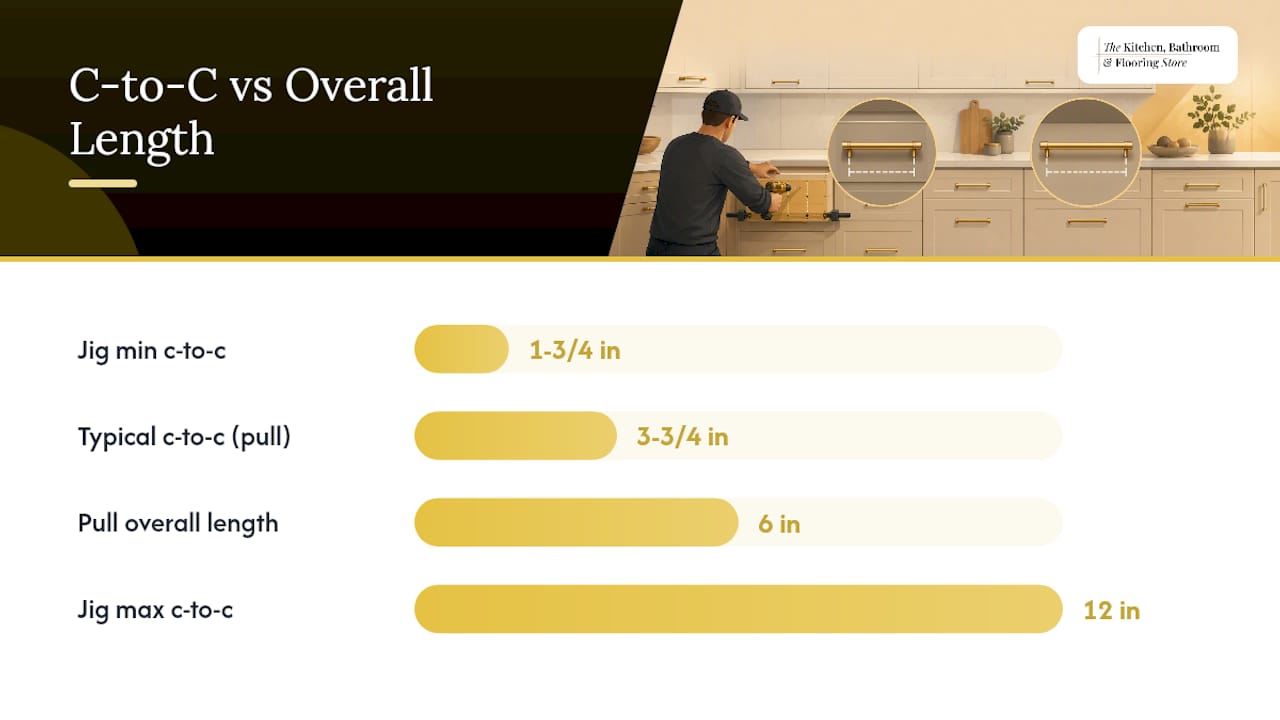
A cabinet hardware jig removes almost all the guesswork here. The Kreg Cabinet Hardware Jig Pro is built to handle center-to-center ranges from about 1-3/4 inches up to 12 inches, with an adjustable end stop you set once and reuse across every door or drawer of that size. That repeatability is the entire point: set it correctly on door one, and doors two through twenty come out identical.
If you’d rather build your own, a simple cardboard or thin plywood template works for a standard 2.5-inch corner knob placement. Cut a right-angle template, mark your hole location at 2.5 inches from each edge, and punch through it with an awl on every door before drilling. It won’t have a jig’s drill guide bushings, but it’s enough to keep a small kitchen consistent.
For drilling technique, a few things matter more than they seem:
One number worth remembering before you shop for hardware: jig ranges like the 1-3/4 inch to 12 inch c-to-c spread cover nearly every residential pull on the market, so buying a single adjustable jig usually outlasts an entire kitchen’s worth of hardware changes.
Once your measurements are set, the actual drilling should be the least stressful part of the day if you follow the sequence in order.
Pro Tip: If a knob or pull spins loose after a few weeks of use, a small dab of clear nail polish or thread-locking compound on the screw threads before final tightening solves the problem permanently, and it’s a trick most hardware stores won’t mention.
Most hardware placement disasters trace back to one of three habits: measuring the wrong dimension, skipping the clearance test, or rushing the jig setup.
Measuring a pull’s overall length instead of its center-to-center spacing is the top offender, and it’s an easy trap since packaging often prints the overall length in larger type. Always confirm c-to-c before you drill a single hole. Skipping the putty-and-clearance test is the second most common error; a pull that looks fine on paper can still slam into a dishwasher handle the moment both are open. And a jig that isn’t clamped tight enough will drift mid-drill, producing the “stair-step” misalignment that’s obvious the moment you step back and look at a full row of cabinets.
If you’ve already got mismatched or off-center holes from a previous install, you have options short of replacing the door. A slightly larger backplate can cover old holes while framing new hardware. Matched wood filler, tinted to the door’s stain, hides smaller mistakes on painted or darker finishes. For light natural wood, though, filler often shows, and at that point replacing just the drawer front is usually cheaper than trying to disguise the repair.
Call a professional when you’re dealing with structural inset-door adjustments, integrating hardware around a paneled appliance front, or making accessibility-driven placement changes that need to match ADA reach ranges precisely.
Hardware placement mistakes rarely happen in isolation. They happen because someone chose a pull after the cabinets were already hung, or picked an appliance panel that didn’t leave enough clearance for the handle everyone wanted.
The Kitchen, Bathroom & Flooring Store handles design, product selection, and installation under one roof specifically to avoid that kind of retrofit problem. When hardware decisions get made during the design phase, alongside cabinet selection and appliance panel planning, there’s no scramble later to find a knob that clears a handle it was never measured against. Our installation teams check clearance and swing paths before a single hole gets drilled, the same collision testing described earlier in this guide, just done as a standard part of the process rather than an extra step a homeowner has to remember.
Some situations genuinely call for professional hands rather than a weekend DIY attempt. Inset doors, with their narrow reveals and near-zero tolerance for error, are one. Integrated appliance panels, where hardware has to match a refrigerator or dishwasher front exactly, are another. And any accessibility-driven placement, where reach ranges and grip strength matter for a specific household member, deserves a second set of trained eyes before the drill comes out.
Corner cabinets break most of the standard rules because there’s often no clean, flat stile to measure from, especially with lazy Susans, blind corners, or diagonal corner units. The door frequently pivots or slides in a way that changes where your hand naturally lands.
For diagonal corner cabinet doors, treat the door edge nearest the room, not the corner itself, as your measuring reference, and always test with putty before drilling since the swing radius can put hardware in an awkward spot you wouldn’t predict on paper. Blind corner cabinets, where one door partially hides behind the adjacent cabinet run, need extra attention to clearance: a pull that works fine when the door’s alone can jam against the neighboring cabinet’s face frame once both are installed.
Angled or unconventional cabinet shapes, like a curved island end panel or an oddly sized appliance garage, call for the same underlying principle every time: find the flattest, most stable section of the door or drawer face, measure your standard offset from there, and physically test before committing to a hole. There’s no universal formula for a pie-cut lazy Susan door the way there is for a standard 18-inch base cabinet.
Standard measurements assume an average adult reach, but kitchens don’t get used by an average person, they get used by whoever’s actually cooking, and that might be a child, a grandparent, or someone with limited mobility.
Upper cabinet knobs placed at the standard 2.5" to 3" from the bottom corner assume a comfortable overhead reach for someone of typical adult height. If the primary user of a kitchen is notably shorter or uses a wheelchair, dropping upper cabinet hardware placement slightly, or choosing base cabinets with pull-down shelving instead, matters more than hitting a textbook number. Lower cabinet and drawer hardware generally sits within comfortable reach for most users already, since it’s positioned near hip or knee height rather than overhead.
Grip strength affects hardware choice as much as placement. A longer pull requires less precision to grab successfully than a small knob, which is why kitchens designed with accessibility in mind often standardize on 4-inch to 6-inch pulls throughout, uppers included, rather than mixing in knobs. If anyone in the household deals with arthritis or reduced hand strength, that single change, longer pulls everywhere, does more for daily comfort than any measurement adjustment.
A kitchen reads as cohesive or sloppy almost entirely based on how well grouped hardware lines up, and the eye is far more sensitive to small misalignments in a row than to any single door viewed alone.
The most reliable trick is picking one horizontal or vertical reference line and holding every piece of hardware to it across an entire run of cabinets, rather than measuring each door independently from its own corner. If you measure door by door, tiny manufacturing variances in door height can compound into a visibly uneven line by the fifth or sixth cabinet. Using a shared jig setting, or snapping a chalk line across the whole run before marking individual doors, keeps every knob and pull locked to the same height regardless of small differences between doors.
For a bank of drawers under a countertop, align the vertical centerline first, then treat every drawer’s pull as sitting on that same invisible column, top to bottom. Mixing knob styles with pull styles in the same run rarely looks intentional unless it’s a deliberate upper-knob, lower-pull split described earlier. Within a single row, consistency in style, finish, and vertical placement is what makes hardware disappear into the design instead of drawing attention to itself.
The door material itself changes how forgiving your placement can be, and it’s worth thinking about before you finalize a jig setting rather than after you’ve already drilled into something unforgiving.
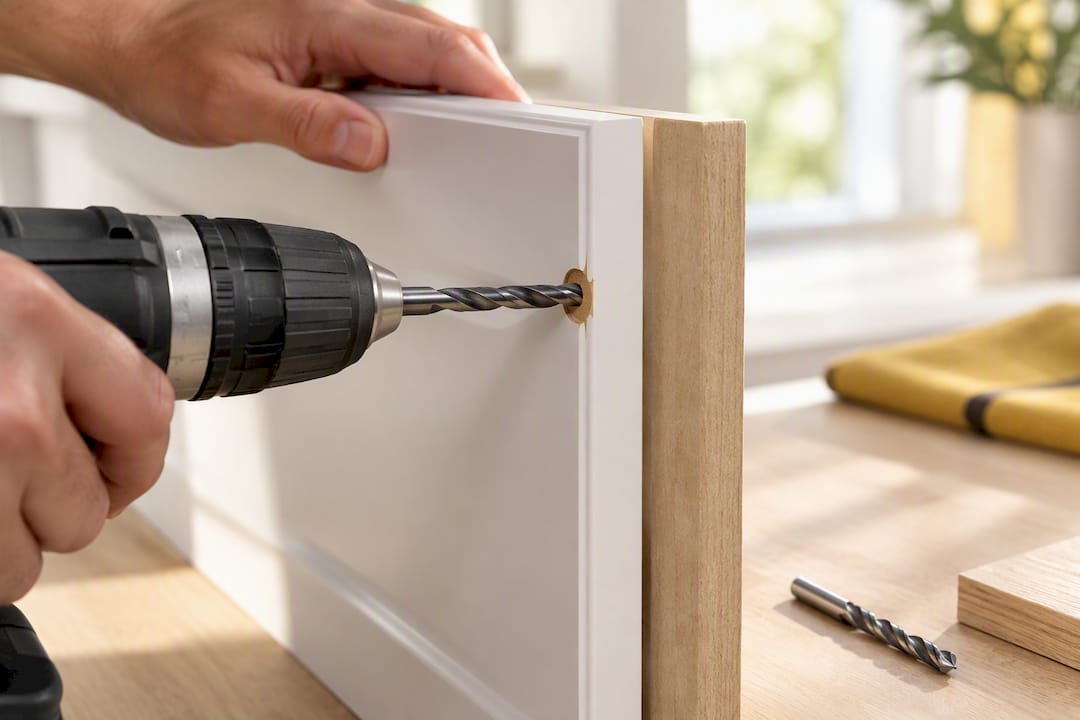
Solid wood doors, whether Shaker or slab, tolerate small placement adjustments and filled mistakes reasonably well, since wood filler and matched stain can hide a minor error on most stained or painted finishes. MDF and thermofoil doors are far less forgiving. Thermofoil in particular can chip or peel at the edge of a drill hole if the bit runs too hot or the backing board isn’t used, and a redrilled hole on thermofoil almost always shows.
Finish also affects how visible hardware placement errors become. High-gloss lacquer and dark, unfinished-look matte finishes both magnify small inconsistencies in a hardware row, since reflected light or contrast draws the eye straight to any pull that sits a fraction of an inch off from its neighbors. Lighter, textured, or lower-sheen finishes hide minor variance better. If you’re working with a glossy or dark finish, that’s exactly the kind of project where a jig, not a tape measure and a pencil mark, earns its cost back in avoided touch-ups.
Templates beat eyeballing every time you’re doing more than two or three doors, because human eyes are terrible at spotting a quarter-inch drift across a dozen cabinets until it’s already drilled. That said, comfort should always beat strict symmetry when the two genuinely conflict, like a knob that technically hits 2.5 inches but lands right under someone’s knuckles on every reach. My one non-negotiable: test with putty before every single hole, no exceptions, even on the tenth identical door in a row.
— Anna
Getting hardware placement right on paper is one thing. Getting it right on twenty real doors and drawers, around real appliance panels, with real ceiling clearances, is another. Some remodelers offer a single connected process that handles design, cabinet selection, and professional installation to better coordinate hardware placement before anything is hung, avoiding fixes after the fact.

Our Kitchen Remodeling Packages pair personalized design with a full selection from our kitchen cabinet inventory, and every project includes on-site verification before drilling begins, the same clearance and collision checks covered in this guide, done by an installer rather than left to a homeowner’s best guess. That verification step, plus our in-house installation warranty, is what removes the retrofit risk that comes with fitting hardware around appliance panels or inset doors after the fact. If your kitchen has corner cabinets, tight reveals, or an accessibility need that makes this a harder-than-average project, reach out to schedule a design consultation and see the cabinet lines and packages available for your space.
For deeper reading, see the NKBA design and construction guidelines, the Kreg Cabinet Hardware Jig manual, and Family Handyman’s installation tips.
The 1/3 rule means choosing a pull whose overall length is roughly one-third of the drawer front’s width, so a 15-inch drawer suits about a 5-inch pull. The screw spacing you actually drill to, center-to-center, is a separate measurement from that overall length.
Common professional practice places knobs 2.5 inches to 3 inches from the door corner and centers pulls on the stile about 3 inches to 4 inches from the rail. Drawer pulls and knobs center on the drawer face both horizontally and vertically.
Longer bar pulls and edge pulls on frameless doors continue to gain ground over small knobs, partly because they suit slab and Shaker styles alike and partly because they’re easier to grip. Mixing knobs on upper cabinets with pulls on lowers and drawers remains one of the most common combinations in new kitchens.
Knobs typically sit 2.5 inches to 3 inches from the door corner, while pulls center on the stile 3 inches to 4 inches from the rail, and both should be tested with removable putty before drilling to confirm clearance. Drawers get centered hardware sized near one-third the drawer’s width.
Yes, professional installation is included as part of our Kitchen Remodeling Packages, which cover design, cabinet selection, and hardware placement in one process. Current pricing details are available on the packages page rather than a fixed published rate.