
The most reliable kitchen lighting plan uses three layers, ambient, task, and accent, split across at least three separate circuits with dimmers so you can control each independently. Task fixtures need to fall on the front edge of your counters, not down the center aisle where your own body blocks the light. Aim for a moderate level of ambient light to provide general illumination, and higher light levels over work surfaces for clarity, with a good color rendering index to ensure accurate color perception. Plan the circuits before drywall goes up.
TL;DR:
- Proper kitchen lighting requires at least three circuits with dimmers to independently control ambient, task, and accent layers for flexibility and effectiveness.
- Task lighting should be aimed at the front edge of counters to avoid shadows, with under-cabinet strips most reliably placed toward the cabinet front.
- Under-cabinet LED strip lights with CRI of 90 or higher and around 4000K color temperature provide the best balance of accuracy and clarity for food prep areas.
- Recessed lights should be spaced based on ceiling height and focused on work zones rather than evenly grid-like, to avoid gaps and wastage.
- Achieving the right brightness involves 30-40 lumens per square foot for ambient lighting and 50-75 lumens for task areas, with CRI of 90+ for food color accuracy.
Every workable kitchen lighting plan rests on three distinct layers, and confusing them is the single biggest reason kitchens end up either dim or glaringly uneven. Ambient lighting fills the room with general illumination, usually from recessed cans or a flush ceiling fixture. Task lighting targets specific work zones like the counter, sink, and cooktop where you actually chop, wash, and cook. Accent lighting adds visual interest, glass-front cabinet lights, toe-kick strips, or a statement pendant, and gives the room what designers call its personality layer, since a kitchen with only functional light tends to feel flat and clinical, according to House Beautiful’s kitchen lighting formula.
Mapping these layers onto your actual floor plan is where most homeowners skip a step. Grab your kitchen sketch and mark three things: where daylight already does the work (near windows and skylights), where the work triangle sits (stove, sink, refrigerator), and where people gather (island seating, a breakfast nook). Each zone usually needs a different mix of layers.
A practical way to sketch it:
Note where a window supplies strong daytime light. In those spots, your artificial layers can run leaner during the day but still need full coverage for evening cooking, which is when most kitchen accidents from poor visibility actually happen.
Task lighting fails most often because it’s centered over the room instead of the work surface. The fix is straightforward: position fixtures so light falls across the front edge of the counter, not the center aisle, so your own body and head don’t cast a shadow exactly where your hands are working, a placement principle laid out clearly by Visual Comfort’s guide to kitchen task lighting.
Here’s a sequence you can follow room by room:
Pro Tip: Stand at your counter in the evening with only your current lighting on and look at your own shadow. If your hands are darker than the counter around them, your task light is in the wrong place, not too weak.
Under-cabinet strips deserve special attention here because they solve the shadow problem more reliably than any ceiling fixture. Practical installation guidance from InspectAPedia’s kitchen lighting specifications confirms mounting toward the cabinet front, rather than centered, is what actually lights the counter surface instead of the backsplash.
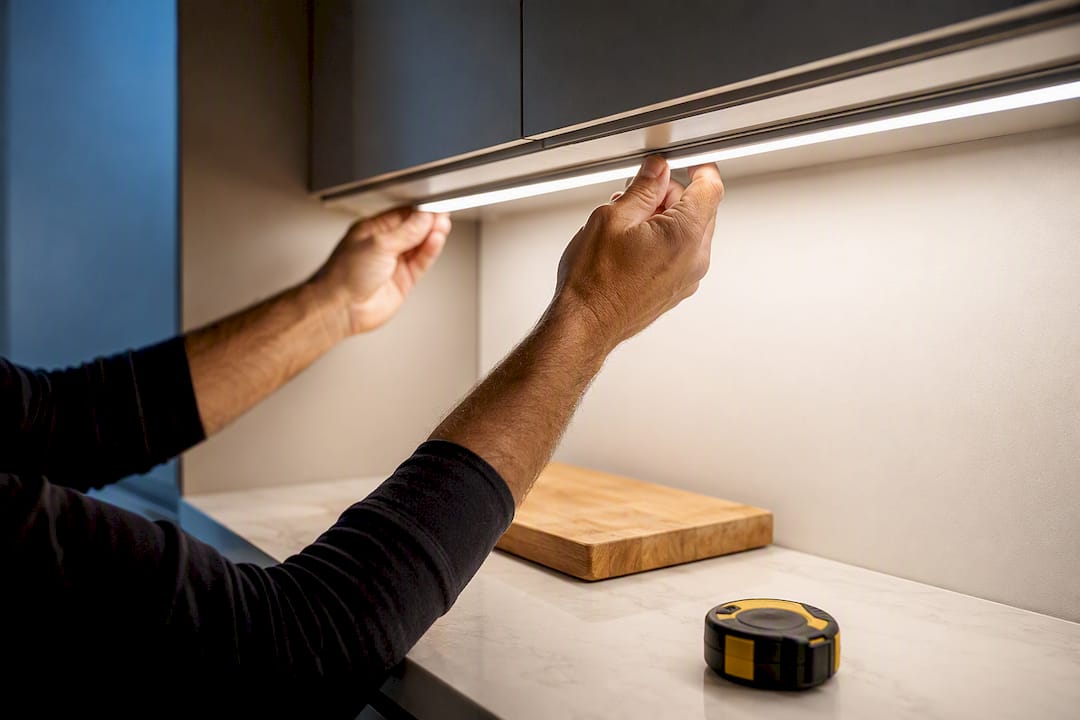
Under-cabinet lighting is the highest-impact, lowest-cost upgrade in most kitchens, but only if you specify it correctly. Three fixture types dominate: LED strip lighting (continuous, even coverage, best for most runs), puck lights (good for accenting specific spots but leaves gaps between fixtures), and integrated linear fixtures (higher cost, cleanest look, often dimmable out of the box). For a standard counter run under upper cabinets, strip lighting almost always beats pucks because it eliminates the scalloped light pattern pucks create.
Mounting placement matters as much as fixture choice. Strips should sit toward the front of the cabinet underside, within the front 1.5 to 2 inches, housed in a frosted aluminum channel that diffuses the light and hides the individual diode points, a detail Lumens’ kitchen lighting design guide calls one of the cheapest, highest-impact upgrades available, provided it’s planned before the cabinets go in.
When you’re comparing products or briefing an electrician, specify:
Pendant sizing over an island isn’t a matter of taste alone, it’s proportion math. A common rule of thumb is to add the island’s length and width in feet, then convert that number to inches for the combined diameter of your pendants. A 4-by-8 foot island (12 combined feet) suggests roughly 12 inches of total pendant diameter, which might mean two 6-inch pendants or three smaller ones spaced evenly.
Hang pendant lights at a comfortable height above the countertop, adjusting higher for taller ceilings to maintain sightline clarity and task effectiveness.
Decorative pendants can still do real task work if you choose ones with an open bottom or a diffuser that pushes light down onto the counter, not just fixtures that glow decoratively without illuminating anything useful below them.
Space recessed lighting roughly based on ceiling height, with fixtures positioned away from walls to effectively illuminate counters rather than ceiling or cabinet faces, a placement detail confirmed by InspectAPedia’s kitchen lighting specifications. A fixture centered too close to the cabinet wastes most of its output on cabinet doors nobody’s trying to read a recipe on.
Pro Tip: Before you finalize can placement, tape your cabinet layout onto the subfloor and stand where you’ll actually cook. Look up. If you can’t see where the light would land on your future counter, move it.
Specifying light in exact numbers, not just “bright” or “warm”, is what separates a kitchen that photographs well from one that’s genuinely pleasant to cook in every day.
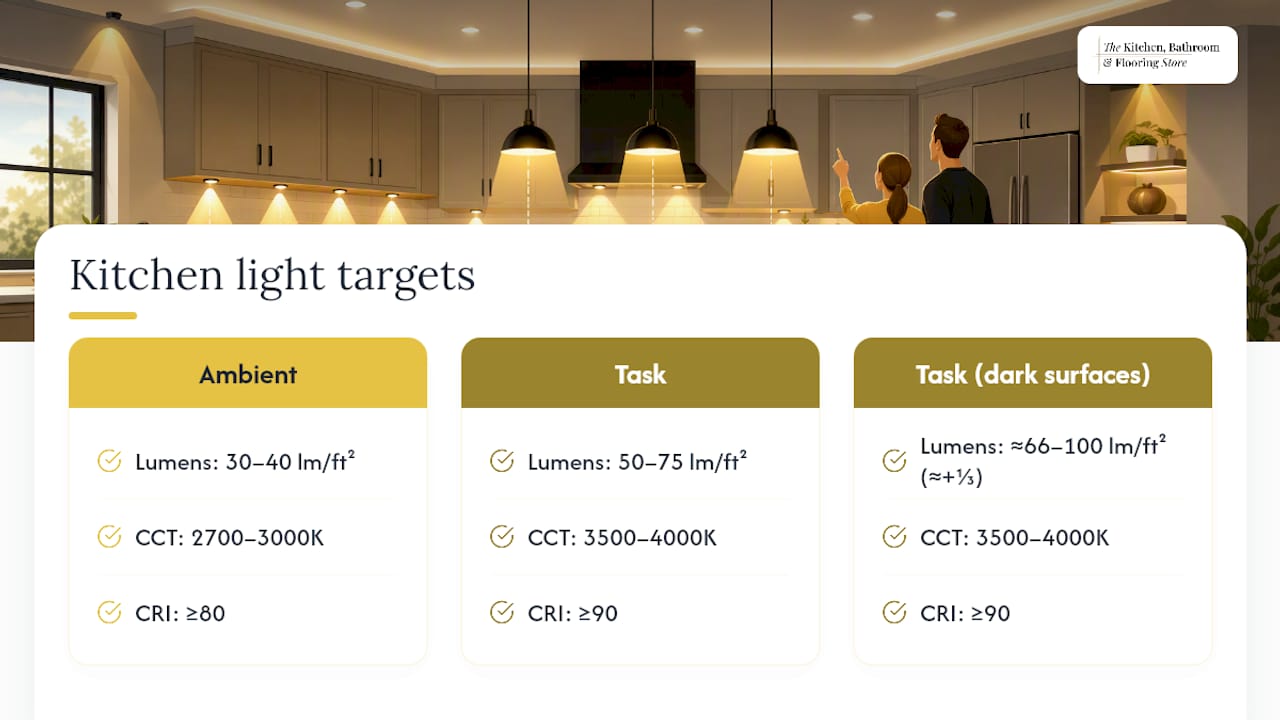
The measurable targets: Ambient lighting should deliver 30 to 40 lumens per square foot; task zones like counters and islands need 50 to 75 lumens per square foot, and dark countertops or cabinetry absorb more light, so bump that task figure up by roughly a third, per Lumens’ kitchen lighting guide.
Color temperature, measured in Kelvin, should generally sit between 2700K and 3000K for ambient and accent layers, that’s the warm, residential glow most people associate with a cozy kitchen. Task lighting works better slightly cooler, 3500K to 4000K, because it reads as crisper and more alert for detail work like chopping or reading labels. Where possible, keep your ambient and task layers within a similar CCT range so the room doesn’t feel like it’s lit by two different eras of technology.
CRI, the color rendering index, deserves equal weight. A minimum of 80 CRI is acceptable for general ambient light, but prep counters and anywhere you’re judging food color or doneness benefit from 90 CRI or higher. Check manufacturer spec sheets before buying, since CRI isn’t always printed on the box itself.
A kitchen lighting layout only works day to day if the controls match how you actually live in the space. Separate circuits let you dim the ambient layer for a dinner party while running full task lighting for cleanup, without one setting compromising the other.
Getting this wrong after drywall is up means cutting into finished walls, so this is the one part of a kitchen lighting plan worth over-planning rather than under-planning.
Most kitchen lighting problems trace back to a handful of repeat offenders, and several of them can be fixed without an electrician.
Weekend fixes include plug-in under-cabinet LED strips, swapping bulbs for higher-CRI, matched-CCT options, and adding a plug-in or retrofit dimmer module. If your fix requires new circuits, moving switches, or anything touching your kitchen’s wiring for code compliance, that’s the point to bring in a licensed electrician rather than push forward with a DIY project.
Before you talk to an electrician, a designer, or a full-service remodeler, gather the measurements that actually drive fixture selection and placement.
Hand this checklist, filled in with your actual measurements, to whoever installs your lighting. It saves callbacks and second guessing on-site.
Lighting rarely gets planned in isolation, and that’s exactly where most DIY plans run into trouble. We build the lighting plan alongside cabinet selection, countertop depth, and layout decisions from day one, because a pendant height or under-cabinet run only works if it’s coordinated with the cabinetry it depends on. Our single-contractor approach to kitchen and bathroom remodeling exists precisely to remove that coordination friction between an electrician, a cabinet installer, and a designer who’ve never spoken to each other.
If your project involves new circuits, permit work, or lighting built into custom cabinetry, that’s typically where DIY planning should hand off to a professional. Straightforward swaps, a plug-in under-cabinet strip or a pendant on an existing junction box, are reasonable weekend projects. Anything touching your electrical panel or wall framing isn’t.
— Anna
A well-measured lighting plan is only as good as the installation behind it, and that’s the gap between a Pinterest board and a kitchen that actually works at 6 p.m. on a Tuesday. A full-service remodeling store can handle design, fixture selection, cabinetry, and installation under one roof, so your lighting plan doesn’t get lost in translation between different contractors who never see each other’s work.

Personalized design assistance and financing options may be available for homeowners who want their lighting plan built into a full kitchen renovation from the start rather than bolted on afterward. If your project touches cabinetry, countertops, or flooring alongside lighting, our showroom overview is a good place to see the full scope of what we handle in-house. Ready to see numbers for your own space? Start with our bathroom remodeling packages page to see how we structure design-to-install pricing and financing, then reach out to schedule a consultation for your kitchen.