
For most standing showers, we recommend centering the niche roughly chest height for an average adult, typically around mid-chest level above the finished shower floor. That range works for most households, but seated users, very tall household members, and your tile layout can all shift the number a few inches. Always measure from the finished floor, not the subfloor, since tile and mortar add real height.
TL;DR:
- Most shower niches should be centered around 44 to 48 inches from the finished shower floor, measured at the wall’s flattest part, but adjustments are needed for seated or tall users.
- Placing the niche on the wall opposite the shower valve minimizes contact with spray and simplifies plumbing clearance, with a typical reach distance of about arm’s length.
- Standard niche depth in a 2x4 wall ranges from 3 to 4 inches, enough for most bottles, while widths of 6 to 14 inches fit common storage needs without extra framing.
- Waterproofing the niche with membrane and fleece tape is critical, especially at corners, to prevent leaks that cause mold and drywall damage over time.
- Avoid measuring from the subfloor, ignore tile layout, and skip proper waterproofing sequence to prevent common installation mistakes that lead to costly repairs later.
This height range covers most standing adults comfortably, placing the niche within easy reach without bending or stretching. If someone in the household showers seated, on a bench or shower chair, lower the niche so it sits comfortably within arm’s reach from a seated position. For very tall users or when the niche doubles as a decorative display shelf, some designers place the niche higher, closer to eye level.
The reference point matters as much as the number. Measure up from the finished shower floor, meaning the tiled and sloped surface the water actually runs across, not the rough subfloor or the framing below it. This distinction gets tricky in curbless showers, where the floor can step down gradually toward the drain, so it helps to pick a consistent measuring point, usually the flattest part of the floor near the niche wall. Our curbless shower guide walks through how floor slope changes that reference in more detail.
Ergonomics and aesthetics sometimes pull in different directions. A niche placed purely for comfort might land at 44 inches, but if that height falls in an awkward spot relative to your tile pattern, you end up with a sliver of cut tile above or below the opening. That’s where the grout-line rule comes in: rather than forcing an exact inch measurement, many installers shift the niche up or down by an inch or two so its top and bottom edges land on a full grout line. The visual payoff is worth the small compromise, and we cover the mechanics of that adjustment later in this guide.
Storage needs also factor in. A niche meant to hold everyday shampoo and conditioner bottles works well around chest height for quick access. A niche meant as a display shelf for candles or decorative items can sit higher, since it’s not something you reach into daily. Before you commit to a number, stand in the shower space (or a taped-out mockup) and reach toward the wall the way you would mid-shower, eyes closed if you want to be thorough. That simple test catches height mismatches that a tape measure alone won’t.
Picking the right wall for your niche matters as much as picking the right height. Designers commonly prefer the wall opposite the shower valve, since that location tends to keep the niche away from the densest cluster of supply piping and reduces the chance of a bath product taking a direct hit of spray every time someone turns on the water. It also simplifies the cut, since the opposite wall usually has fewer pipes to route around.
That said, the wall closest to the entry or the one you naturally face while showering is often the most convenient for reach. Weigh convenience against exposure: a niche directly in the spray path stays wetter longer, which can shorten the life of bottle labels and encourage water spotting on glass containers.
Before anyone starts cutting, run a few quick checks:
Reach distance is worth testing physically rather than estimating. Stand in the spot where you’d normally shower and extend your dominant hand toward the wall you’re considering. Most adults comfortably reach a moderate distance without leaning, which should guide how far the niche sits from your typical standing position, not just its height. If the household includes both left and right handed users, centering the niche rather than favoring one side avoids awkward reaches for whoever showers second.
Interior depth is often the most overlooked dimension, and it’s constrained by more than the bottles you want to fit. A standard 2x4 wall gives you roughly 3.5 inches of stud cavity, but once you account for the waterproofing membrane, backer board, and tile on the back wall of the niche, usable depth typically lands between 3 and 4 inches. That’s enough for most shampoo and body wash bottles standing upright, though oversized pump bottles may need a deeper cavity built into a furred-out or 2x6 wall section.
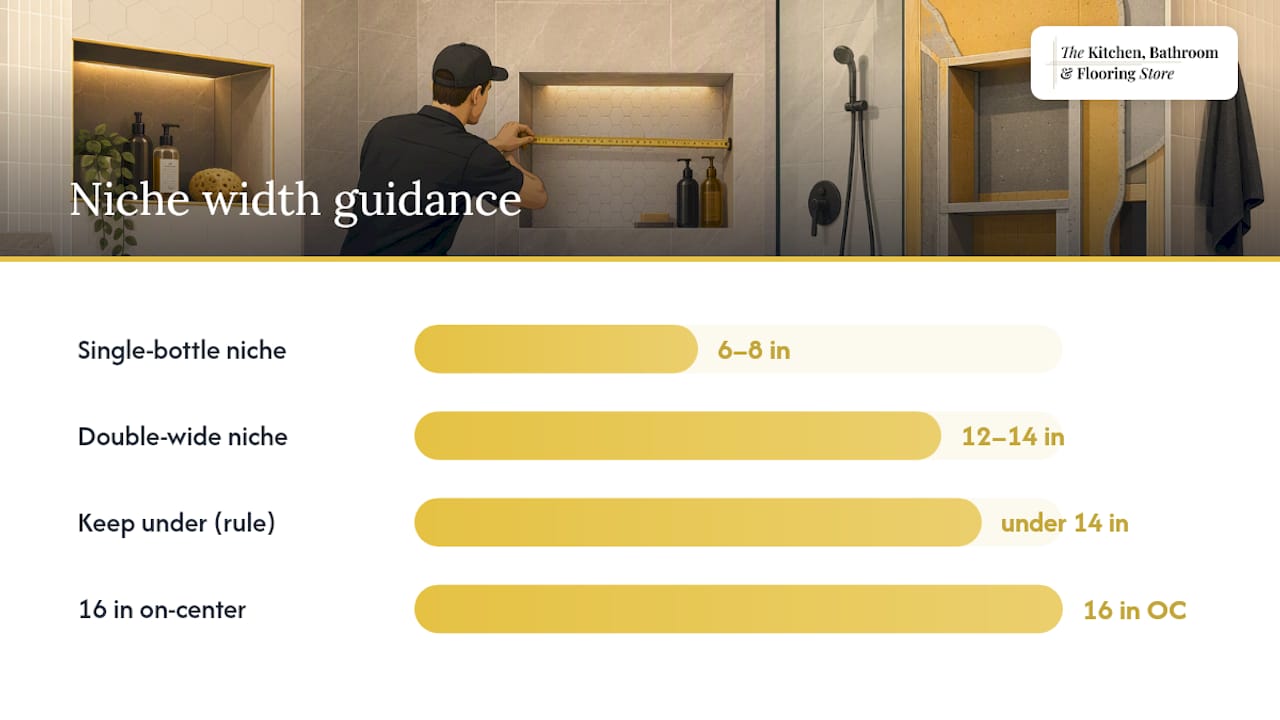
Width depends on what the niche needs to hold and how it fits within the stud layout. A single-bottle niche often runs 6 to 8 inches wide, while a double-wide niche meant to hold several products comfortably runs 12 to 14 inches. That 14 inch figure isn’t arbitrary: keeping interior niche widths under 14 inches avoids cutting through a stud in walls framed 16 inches on-center, which keeps the installation simpler and cheaper.
Internal shelf height, meaning the vertical space between the niche’s shelves or between the top and bottom if it’s a single open box, should account for the tallest bottle you plan to store plus a little clearance. About a foot of clear height per shelf comfortably fits most shampoo and conditioner bottles with room to spare. Tile size affects this too: a niche sized to align with 12 by 24 inch tile modules will naturally divide into clean shelf heights, while oddly sized niches force awkward tile cuts on the interior faces.
Vertical niches, taller than they are wide, suit narrow wall sections and hold more bottles in a smaller footprint, making them a strong fit for tight stud bays. Horizontal niches, wider than they are tall, work well for households that prefer laying bottles on their side or want a shelf for wider items like soap dishes or razors, but they’re more likely to require a header if the width exceeds 14 inches.
A shower niche is essentially a hole cut into your waterproofing plane, so getting the sequence right matters more here than almost anywhere else in the shower. Corners and seams inside the niche are the most common leak points, since water collects at the bottom and works its way into any gap in the membrane. The correct approach treats the niche cavity with the same rigor as the shower floor.
Grout alone, without a membrane underneath, isn’t a waterproofing layer. It is porous, and over time it lets moisture through to the substrate, which is exactly how niches develop mold or soft drywall behind the tile. The membrane and tape do the real waterproofing work; the tile and grout are the finish layer on top of it.
Prefabricated niche liners, preformed boxes that drop into a framed opening, have become a popular shortcut. They arrive pre-sloped and pre-sealed, which removes some of the field-built steps above and reduces the chance of installer error. The tradeoff is less flexibility in exact sizing and depth compared to a custom, field-built niche, so they suit standard openings better than oddly shaped or oversized ones. Our shower niche ideas post covers sizing tradeoffs between prefabricated and custom-built options in more depth.

Pro Tip: Dry-fit your tile layout around the niche opening before applying any waterproofing, so you’re not discovering a bad grout-line alignment after the membrane has already cured.
A basic materials checklist for the niche cavity: waterproofing membrane sheets or liquid-applied membrane, fleece seam tape, a bonding flange if using a prefabricated box, thin-set mortar rated for the membrane system, and a penetrating grout sealer for the finished joints.
Aligning a niche to your tile’s grout lines creates a cleaner finished look and cuts down on wasted material, since the alternative usually means narrow sliver cuts above, below, or beside the opening. Designers often nudge the niche’s exact height or width by an inch or so specifically to land its edges on a full grout line rather than forcing the tile to work around an arbitrary measurement.
To plan this well, start with your tile module dimensions, meaning the tile size plus the grout joint width, and work out where full tiles will fall on the wall before you finalize the niche opening. A niche sized and positioned to interrupt only full tiles, or tiles cut in clean halves, reads as intentional. A niche that clips a tile into a thin strip reads as a mistake, even when the installation itself is solid.
A few practical habits help here:
Edge treatment affects your final numbers more than most people expect. A niche finished with metal trim keeps its rough opening dimensions close to the finished ones, while mitered tile edges (where the tile itself wraps the corner) can shrink the usable interior space by the thickness of the tile itself. Our tile guide for modern bathrooms goes deeper into how tile module planning affects layout decisions like this one.
Most interior walls are framed with studs spaced 16 inches on-center, and that spacing is the main constraint on how wide a niche can be without extra framing work. Keeping the niche’s interior width under 14 inches lets it fit between two studs without cutting either one, which keeps the job simpler, faster, and less expensive.
Wider niches are possible, but they require cutting through a stud and installing a header, meaning horizontal framing members above and below the opening that redistribute the load the stud was carrying. That’s a straightforward job for an experienced framer but adds time, lumber, and labor cost compared to a niche that fits cleanly between existing studs.
A 2x4 wall can absolutely hold a shower niche, and it’s the standard framing for most bathroom walls. The main tradeoff is a relatively shallow depth before backer board and tile, which fits most bottles but not oversized ones. If deeper storage matters more than sticking with standard framing, options include furring out the wall section with additional lumber or building the niche into a slightly thicker wall section during a full remodel.
Before cutting into any wall, whether it’s framed in 2x4s or something heavier, check for plumbing and electrical:
The most frequent shower niche mistakes are avoidable with a little planning up front. Wrong height tops the list, usually from measuring off the subfloor instead of the finished floor, or picking a height that ignores who actually uses the shower. Ignoring tile layout is close behind, leading to sliver cuts that make an otherwise good installation look unfinished. Poor waterproofing, especially skipping fleece tape at interior corners, causes the leaks that show up months or years later as soft drywall or visible mold. Niches cut too wide force expensive header framing that could have been avoided with a slightly narrower design, and niches cut too shallow leave no room for the bottles they were meant to hold.
Quick fixes exist for most of these. A height that’s slightly off can often be corrected by adjusting to the nearest full grout line rather than the exact original number. A niche that turns out too wide for the framing can be resized to fit between studs instead of adding a header. A shallow cavity in a 2x4 wall can be supplemented with a shallow prefabricated box designed for exactly that constraint.
Shower niche planning is ideally handled as part of a full bathroom remodeling process, from initial design through installation, to catch height, tile, and framing conflicts before they become expensive fixes mid-project. When design and installation teams work from the same plan, a niche height that looks good on paper can be checked against actual tile module dimensions before anyone cuts into a wall.
A few installer habits to consider: always confirm the finished floor height on-site rather than trusting a rough framing measurement, and dry-lay tile sheets against the niche opening before waterproofing to catch layout problems early. For more on sizing and style options, the shower niche ideas post and the bathroom shower and tub installation page offer details commonly covered during design.
Most height charts treat 42 to 48 inches as a rule instead of a starting point, and that’s where a lot of finished niches end up looking slightly off. The number matters less than the two things people skip: measuring from the actual finished floor, and checking that height against your real tile layout before anyone picks up a saw. A niche that’s technically at 44 inches but clips a tile into a two-inch sliver will always look worse than one nudged to 45 inches that lands on a clean grout line.
The other thing that gets underweighted is waterproofing sequence. Homeowners fixate on the visual decisions, height, width, tile pattern, and treat waterproofing as a given, when it’s actually the step most likely to cause expensive problems years later. If you only prioritize one thing from this guide, prioritize the membrane and seam tape over the exact inch measurement. A niche a little too high still works fine. A niche that leaks doesn’t.
— Anna
Planning a shower niche on your own means juggling height, tile alignment, framing, and waterproofing all at once, and getting any one of them wrong means living with the result or paying to redo it. We handle all four together, since our design consultants and installation crews work from the same project plan instead of passing measurements between separate contractors.

If you’re planning a full shower or bathroom remodel, Bathroom Remodeling Packages can cover design, tile, and niche placement as part of one project. For shower and tub specific work, the Bathroom Showers & Tubs service page details a common installation approach.
You may reach out through either page above to get a project started or ask about financing options for your remodel.
About a foot of clear height per shelf comfortably fits most shampoo and conditioner bottles with room to spare, so a single 12 inch niche can feel tight for two or more standard bottles. If you’re storing full-size products, consider a taller niche or one with a second shelf.
The most frequent mistakes are measuring height from the subfloor instead of the finished floor, ignoring tile layout and ending up with narrow sliver cuts, and skipping proper waterproofing at interior corners and seams. Building a niche too wide for the stud spacing, which forces extra header framing, is another common and avoidable error.
Vertical niches fit narrow wall sections well and hold more bottles in a smaller footprint, making them a common choice for standard stud bays. Horizontal niches suit households that prefer laying products on their side or want extra shelf width, though wider horizontal designs are more likely to require header framing.
Yes, a 2x4 wall is standard framing for most bathrooms and can hold a shower niche without structural issues. The main limit is depth, since a 2x4 cavity offers roughly 3.5 inches before backer board and tile, which fits most bottles but may feel tight for oversized pump containers.