
Most kitchens need an island between 4 feet and 8 feet long, 24 to 36 inches deep, and finished at 36 inches tall for prep work or 42 inches for bar seating. Before anything else, check one number: the clearance between your island and the nearest perimeter counter or appliance. According to contractor-level planning standards, that aisle needs a minimum of 42 inches for a single cook and 48 inches if two people cook together or if an appliance door opens into that path.
The single most common island mistake is choosing a size that looks right on paper but leaves less than 42 inches of clear aisle. Grab a tape measure right now and check the distance between your existing counters. That number tells you immediately whether an island is realistic and how large it can be.
The most important rule in kitchen island sizing is clearance first: a 42-inch work aisle for a single cook and 48 inches when appliances open into that path are the numbers that determine whether an island works or creates a bottleneck.
| Point | Details |
|---|---|
| Finished island heights | 36" for standard prep; 42" for bar seating; 34" for accessible counters |
| Core length and depth ranges | Small: 48" × 24"–30"; Medium: 60"–72" × 30"–36"; Large: 84"–96"+ × 36"–42" |
| Primary clearance rule | 42" minimum work aisle for one cook; 48" minimum when two cooks or an appliance opens into the aisle |
| Overhang for seating | 12" minimum; 15"–18" for comfort; pair with correct stool height for 36" or 42" counter |
| Test before you build | Tape the footprint on the floor, lay cardboard, and check every appliance swing before finalizing dimensions |
| The Kitchen, Bathroom & Flooring Store | Provides full-service design, measurement, and installation so your island fits correctly the first time |
Standard finished island height is 36 inches, matching most perimeter counters and making prep work comfortable for the average adult. A bar-height island sits at 42 inches and pairs with taller counter stools, which works well when the island is primarily for seating rather than chopping and mixing. Some households with accessibility needs opt for a lower section at 34 inches, following ADA-aligned guidance from the NKBA Planning Guidelines.
Length and depth vary more than height does, and they depend almost entirely on how much clear floor space you have after accounting for aisles.
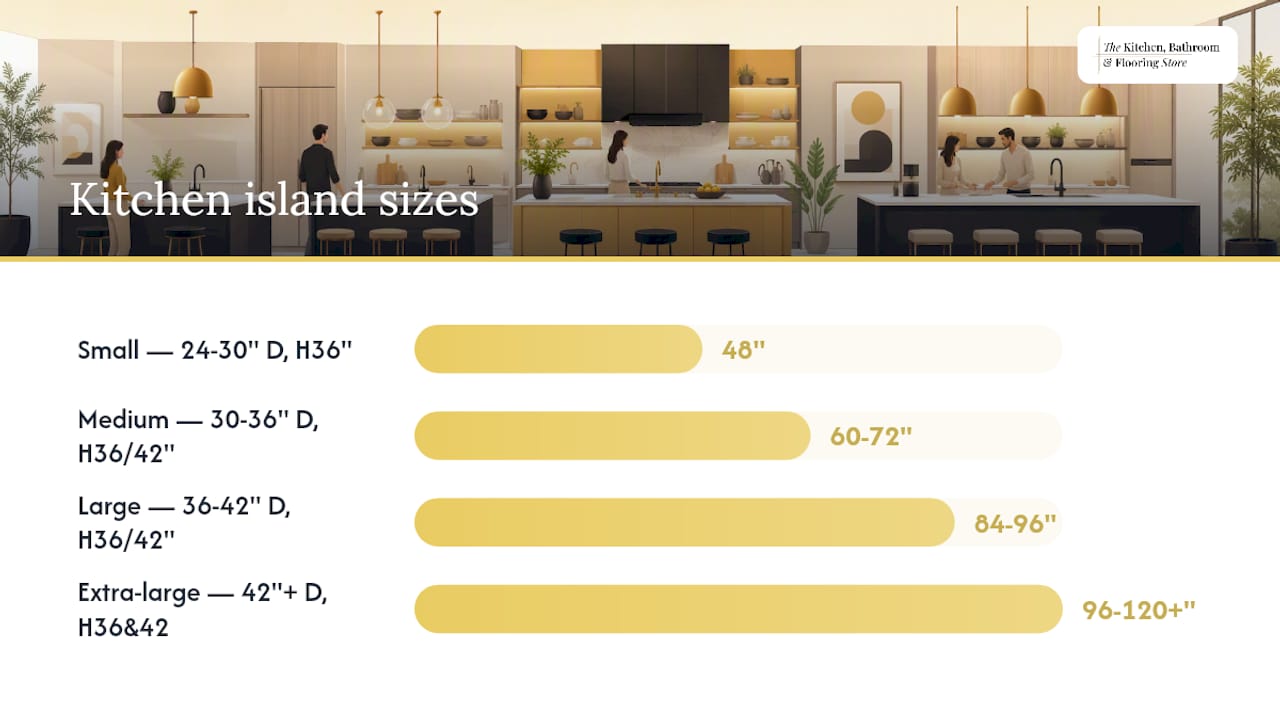
| Kitchen Size | Island Length | Island Depth | Finished Height |
|---|---|---|---|
| Small | 48" (4’) | 24"–30" | 36" |
| Medium | 60"–72" (5’–6’) | 30"–36" | 36" or 42" |
| Large | 84"–96"+ | 36"–42" | 36" or 42" |
| Extra-large / open plan | 96"–120"+ | 42"+ | 36" and 42" (tiered) |
The Spruce kitchen island planning guide notes that a 24"–30" depth is the practical minimum for a usable prep surface, while 36" opens up room for a single-basin sink or a small appliance on one side. Going to 42 inches or beyond makes sense only when you are adding seating, a cooktop, or a dishwasher drawer.
Seating capacity at a glance:
These counts assume seating on one side only. If you want seating on two sides, add at least 12 inches of depth to the island and confirm you still have 42 inches of aisle on every side.
Clearance is where most island plans fall apart. The numbers are straightforward, but they are non-negotiable once you start cooking.
ArchKit’s contractor checklist sets the standard clearly:
Homes & Gardens recommends targeting 42"–48" in front of work surfaces for comfort and efficiency, not just the bare minimum. That extra 6 inches makes a real difference when you are pulling a sheet pan from a 30-inch oven and need to turn around without bumping into the island.
Appliance and drawer swings to account for:
If your oven opens into the work aisle, that 48-inch rule becomes critical. A 42-inch aisle with a fully open oven door leaves roughly 16–18 inches of clearance, which is not enough to stand safely. The NKBA’s 2023 DC Guidelines define clear floor spaces at each activity center, and those illustrations show exactly why overlapping appliance swings demand the wider 48-inch aisle.
Seating is the detail that most homeowners underestimate when sizing an island. The overhang, not just the total depth, determines whether stools are comfortable.
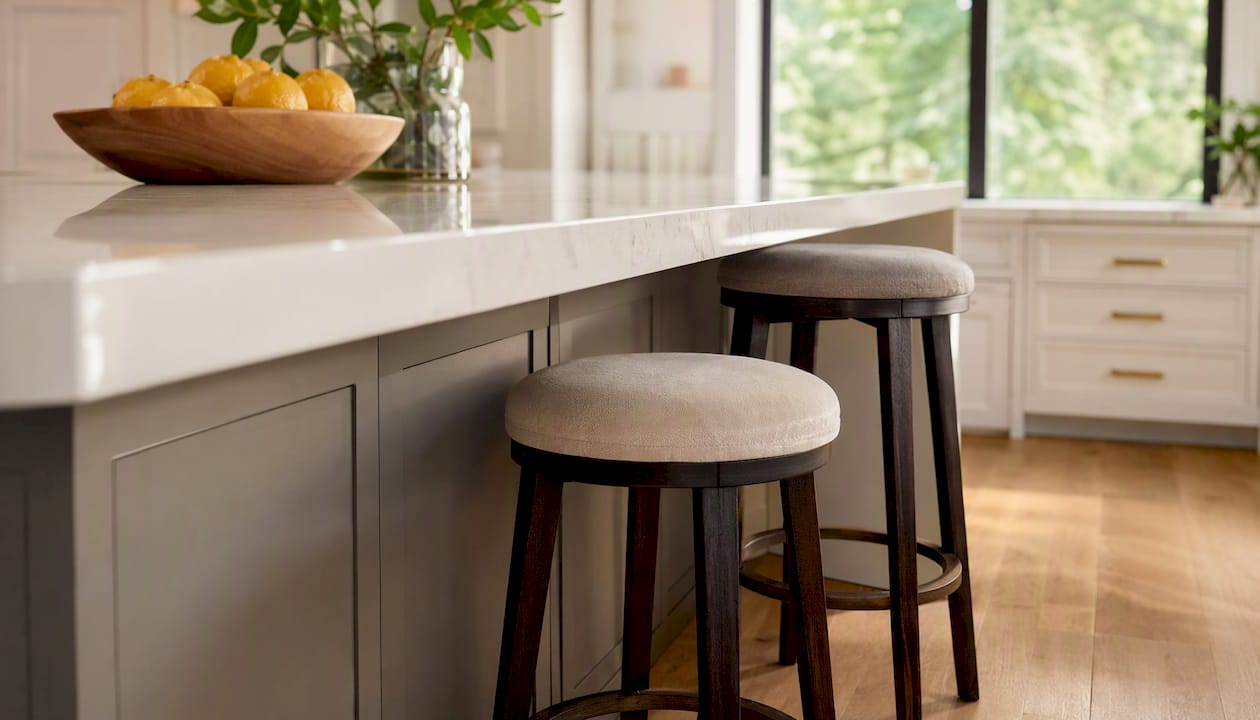
A standard 12-inch overhang works for counter-height seating at 36 inches, giving enough knee room for most adults on a backless stool. For real comfort, especially for longer meals, 15 to 18 inches of overhang is better. That extra depth keeps knees clear of the cabinet face and lets people sit squarely rather than perching at an angle.
Overhang and height pairings:
Pro Tip: Before finalizing overhang depth, sit on the stool you plan to buy and measure the distance from the front of your knees to the back of your calves. That measurement is your minimum overhang. Most adults need at least 13 inches; taller adults often need 15 or more.
One trade-off worth knowing: every inch you add to the overhang reduces usable prep surface on the opposite side of the island. A 36-inch-deep island with an 18-inch overhang leaves only 18 inches of working counter on the cook’s side. For a family that uses the island heavily for prep, kitchen renovation planning guides consistently recommend keeping the prep side at least 24 inches wide, which means the island depth needs to be at least 42 inches if you want both functions.
Seat spacing also affects how many people you can realistically fit. At 24 inches per seat, a 72-inch island fits three stools. At 28 inches per seat, the same island fits only two comfortably. Plan for the stool type you actually want, not the minimum.
What you plan to do at the island determines its footprint more than any other single factor. A prep-only island can be as narrow as 24 inches and as short as 48 inches. Add a sink, and you need at least 36 inches of depth and enough length to keep the sink basin clear of the seating overhang. Add a cooktop, and the depth requirement jumps again, plus you need ventilation directly above.
Function-based size and service requirements:
Any island wider than 48 inches should include at least one electrical receptacle. The NKBA’s 2023 DC Guidelines make this a planning standard, and the NKBA Planning Guidelines extend this to cover lighting controls and ventilation placement as part of updated systems planning. Skipping the outlet rough-in during construction means cutting into finished cabinetry later, which costs far more than planning for it upfront.
A cooktop on the island also changes your clearance math. Ventilation hoods typically require 30"–36" of clearance above the cooking surface, which affects ceiling height requirements. Downdraft systems avoid the overhead clearance issue but require a deeper island to house the blower mechanism. Either way, the island footprint grows, and so does the project budget.
For kitchen space planning, the rule of thumb is simple: decide on function first, then size the island around it, not the other way around.
Real kitchen dimensions are the best teacher here. These examples use the clearance rules above to show what actually fits.
The Spruce sets the minimum island width at 24"–30" and recommends at least a 12’ × 8’ kitchen footprint before adding any island. A 10’ × 12’ kitchen can accommodate a small island, but only if the perimeter layout leaves enough clear floor space after accounting for all appliance swings.
When the space is too tight for a fixed island:
A properly sized island adds real value to a home. A poorly sized one creates a bottleneck that makes the kitchen feel smaller, not larger, and can affect resale appeal. A well-planned kitchen remodel consistently ranks among the renovations with the strongest return on investment.
Testing on-site before committing to a purchase or a contractor quote is the single best thing you can do. Plans look clean on paper; real kitchens have walls that are not quite square, appliances that stick out further than their spec sheets suggest, and doors that swing wider than expected.
Tools that make this easier:
Most sizing errors come from planning visually rather than dimensionally. Here are the ones we see most often.
Pro Tip: If you are torn between two island lengths, choose the shorter one and preserve the wider aisle. You will use the extra circulation space every single day. The extra counter length will feel like a luxury only occasionally.
Pantry and cabinet door clearances are another easy thing to overlook. A pantry door that swings into the work aisle can eliminate the clearance you carefully measured, so always check every door in the kitchen, not just appliance doors.
Standard island sizes work well in most kitchens with conventional layouts. If your kitchen is roughly rectangular, your appliances are in predictable positions, and you want a prep surface with seating, a standard 36" × 72" or 36" × 84" island from a cabinetry line will likely serve you well. Lead times are shorter, costs are more predictable, and installation is straightforward.
Custom sizing makes sense in a few specific situations. An awkward L-shaped kitchen, a kitchen with a structural post in an inconvenient location, or a layout where the only viable island position requires an unusual depth to clear a doorway, all of these benefit from a custom footprint. The same applies when you want to integrate a cooktop with a built-in downdraft, a prep sink on one end, and seating on the other. That combination of functions rarely fits cleanly into a standard module.
Budget and timeline are honest decision factors too. Custom cabinetry typically adds cost and extends lead time. If your kitchen remodel has a firm move-in date or a tight budget, a well-chosen standard island with thoughtful accessories often delivers 90 percent of the function at a fraction of the custom price. The question to ask yourself: does my kitchen have a dimension or a function requirement that a standard module genuinely cannot meet? If the answer is no, standard is the smarter choice.
Getting the dimensions right on paper is one thing. Translating those numbers into a finished kitchen, with plumbing, electrical, cabinetry, and countertops all coordinated, is where most homeowners benefit from professional support.

The Kitchen, Bathroom & Flooring Store handles every step of a kitchen remodel from initial measurement through final installation, with no need to coordinate separate contractors. Our design team uses on-site measurement and layout verification to confirm island clearances, service rough-in locations, and cabinetry fit before a single cabinet is ordered. We carry a full selection of island cabinetry, countertops, and tile, so you can see materials together in our showroom and make confident decisions. Our remodeling packages are structured to fit a range of budgets, with financing options available. Whether you are planning a prep-only island or a full kitchen renovation with a cooktop and seating, contact us to schedule a design consultation and get a precise measurement of your space.
These are the primary references behind the guidance in this article. Each one covers a specific dimension of island planning in more detail.