
The most versatile bathroom tile patterns are herringbone, subway/stacked, straight grid, diagonal, basketweave, checkerboard, and hex or mosaic. The rule of thumb: match pattern to room scale, sightlines, and shower drain type, since a point drain forces small-format mosaics while a linear drain opens the door to large-format tile. Layout planning and grout choices matter just as much as the pattern itself.
TL;DR:
- Point drains necessitate small-format mosaic tiles due to their multi-directional slope requirements, while linear drains accommodate large-format tiles easily.
- Dry-laying the pattern and adjusting the layout before installation helps avoid narrow or awkward cuts in visible areas, improving final appearance.
- Large-format tiles and vertical stacking make small bathrooms feel taller and more spacious, especially when used on floors and walls.
- Choosing grout color carefully and testing it on samples prevents unexpected shade shifts after installation.
- Properly flat substrates and adherence to industry standards are essential for large-format tiles to prevent lippage and ensure durability.
Every pattern has a personality, and picking the right one starts with knowing what each actually looks like on the wall or floor, not just in a showroom sample board.
For a deeper look at how tile choice reshapes a room’s overall feel, see how tile functions in modern bathroom design.
Pattern selection changes depending on whether you’re tiling a floor, a wall, or a shower pan, and room size shifts the calculus again.
Pro Tip: Judge a pattern from where you actually stand, not from a floor plan. Dry-lay the tile and view it from the doorway or shower entrance at eye level, because a mathematically centered layout can still put an awkward narrow sliver right in your main sightline.
If you’re renovating a smaller footprint, these space-stretching tile tactics go deeper on the size question.
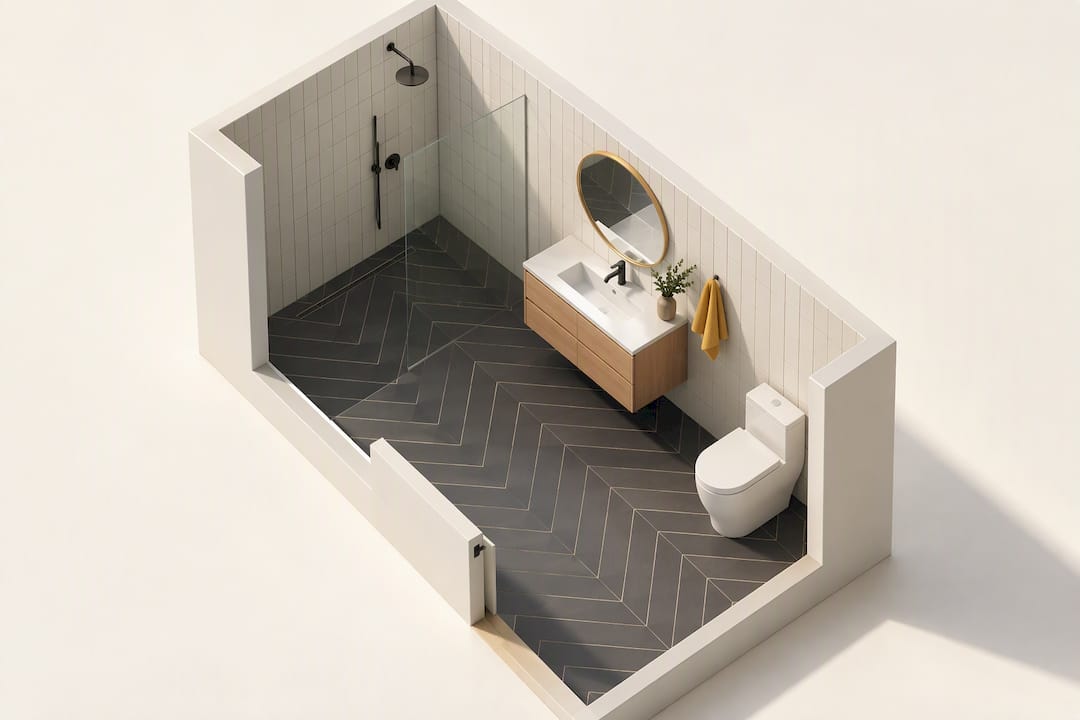
A pattern only looks intentional when the layout is planned before the first tile ever touches thinset. Skipping this step is how homeowners end up with a two-inch sliver of tile awkwardly stranded next to the toilet.
Statistic Callout: The TCNA Handbook specifies substrate flatness tolerances and required movement joints for tile assemblies, standards that matter even more once large-format tile enters the picture, since bigger tiles amplify any unevenness underneath. Our guide to bathroom layout planning walks through how sightlines interact with fixture placement.
The drain you pick determines the tile pattern more than almost any design preference, and most homeowners choose the pattern first and the drain second, which is backward.
Prefabricated sloped shower trays paired with linear drains have made curbless, large-format showers far more achievable for a standard bathroom renovation than they were a decade ago.
Pattern is only half the equation. The tile body and surface finish decide whether that pattern holds up to daily steam, water, and bare feet.
For a full breakdown of how material choice affects your total renovation budget, check what drives bathroom tile costs.
Pro Tip: Before locking in a grout color, look at our guide on testing grout samples so you don’t discover a shade shift after the whole floor is set.
The biggest misconception we run into is that a “unique” tile layout requires exotic material. It doesn’t. The most striking bathrooms we’ve seen often use one affordable tile set in two directions, a herringbone entry that resolves into a straight-set field, for instance. Homeowners chase trendy tile shapes when the real transformation usually comes from orientation and grout contrast, not from spending more per square foot.
We also think too many renovation plans pick the pattern before the drain, which sets homeowners up for disappointment when their dream large-format shower floor turns out to be physically incompatible with a point drain. The Kitchen, Bathroom & Flooring Store handles bathroom tile installation with design assistance built into the process specifically so that sequencing problem doesn’t happen. Feedback from clients often points to peace of mind, knowing the pattern chosen on paper is the pattern that actually gets installed, drain constraints and all. Our tile guides and Jacksonville-based installation team exist because pattern selection and technical feasibility need to happen in the same conversation, not two separate ones.
— Anna
Picking a pattern is the fun part. Getting the drain slope, substrate flatness, and grout joints right is where most DIY projects run into trouble, and it’s exactly where Specialized bathroom remodeling packages take over, providing design, tile selection, and installation services coordinated under one management to simplify the process.

Whether you’re drawn to a herringbone floor, a large-format shower wall, or a vintage checkerboard powder room, our design team can walk you through which pattern fits your layout and your drain type before any tile is ordered. Explore the Bathroom Remodeling Packages to see how design consultation, tile selection, and professional installation come together, or visit the showroom to schedule a design consultation and see tile samples in person.
For technical depth beyond this guide, the TCNA Handbook covers installation methods and substrate standards, Schluter details shower drain and slope guidance, This Old House offers practical layout technique, and Custom Building Products explains grout-joint sizing.
Subway tile in a classic offset layout remains the most widely used bathroom tile pattern because it’s affordable, timeless, and easy to install. Herringbone and straight grid layouts follow closely behind, especially for homeowners wanting a more modern or textured look.
The rule refers to offsetting rectangular tile by one-third of its length in each row rather than the traditional half offset, which reduces lippage risk with larger-format planks. It’s especially relevant for tiles longer than 12 inches, where a half offset can create uneven edges from natural warping.
Large-format porcelain with minimal grout lines, paired with a bold accent zone like a herringbone niche or a vertical stacked feature wall, is the dominant look right now. Warm, textured mosaics for shower floors are also trending as a counterpoint to the sleek, large-format field tile elsewhere in the room.
Large-format tile in a straight grid on the floor, combined with vertical stacked tile on the walls, makes a small bathroom read larger by minimizing grout lines and drawing the eye upward. Reserve intricate mosaics or busy patterns for a single accent zone, like the shower floor, rather than spreading them across the whole room.
Yes. A point drain requires a multi-directional slope that only small-format mosaic tile can conform to, while a linear drain allows a single-plane slope that opens up large-format tile options. Deciding on drain type before finalizing your tile pattern avoids discovering the incompatibility mid-project.