
The kitchen work triangle connects your stove, sink, and refrigerator into an imaginary triangle designed to cut wasted steps while you cook. It still works well in small and galley kitchens, but in open-plan or multi-cook households, most designers now layer in zone planning around it. Either way, check any layout against the National Kitchen & Bath Association’s measurement guidelines before you commit.
TL;DR:
- The measurement of the kitchen work triangle should be from the centers of appliances and sinks, not from cabinet edges, to ensure accurate flow.
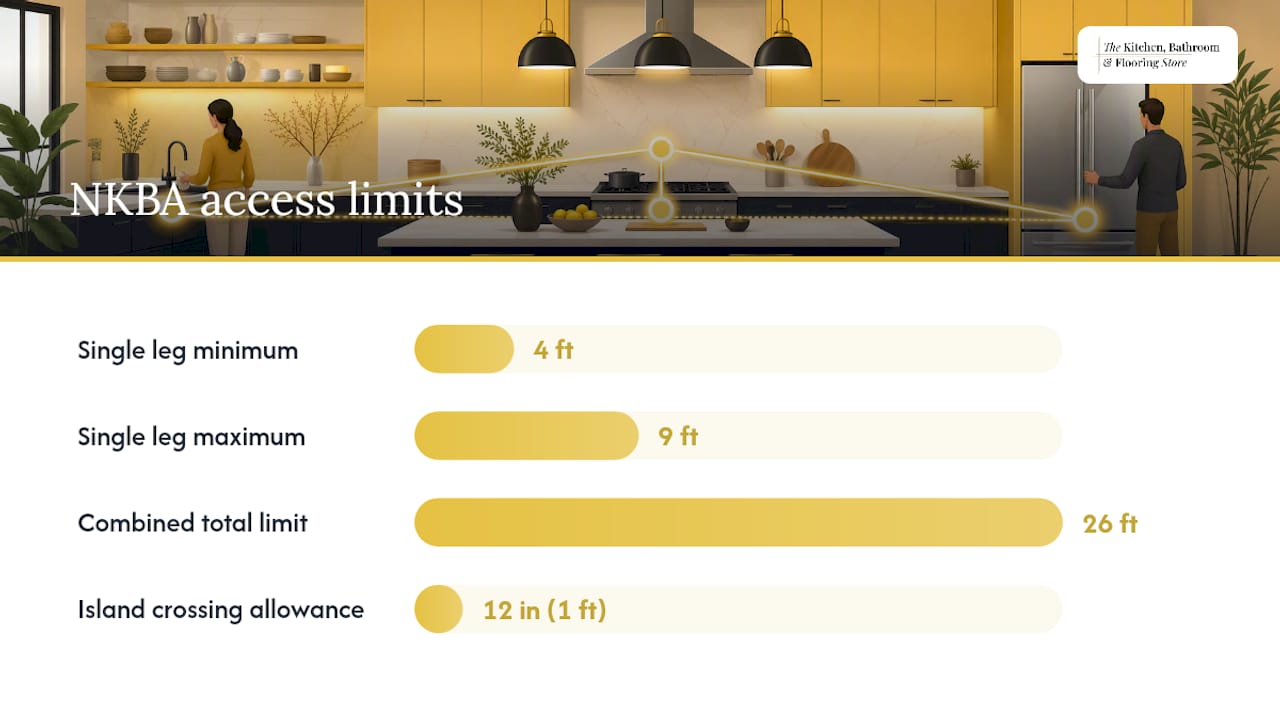
- The NKBA standards specify triangle legs between 4 and 9 feet, with a total not exceeding 26 feet, and allow a 12-inch crossing allowance for islands.
- Larger, open-plan kitchens should incorporate zone planning and additional features like second sinks or beverage stations instead of relying solely on the triangle.
- Common layout errors include blocking triangle legs with large islands and insufficient landing space near major appliances, which can be fixed with simple rearrangements.
- In multi-cook or open kitchens, the traditional triangle is less effective, and expanding to multiple zones with tailored layouts improves functionality.
A work center is any spot where a specific task happens: cooking at the range, washing at the sink, storing food at the fridge. Draw a line connecting the center front of each of those three appliances, and you’ve got your triangle.
Measuring it correctly matters more than most homeowners realize. You measure from the center front of the sink basin, the center front of the cooktop, and the center front of the refrigerator door, not from the edges of the cabinets around them. A triangle measured from countertop corners instead of appliance centers will give you numbers that look fine on paper but feel wrong in practice.
Pro Tip: Grab a tape measure and a piece of string before you touch a single cabinet. Loop the string between the three center points and lay it flat against a scaled floor plan. It takes five minutes and it will tell you more than any showroom mockup.
The NKBA’s kitchen and bath planning guidelines set the benchmark most designers still use:
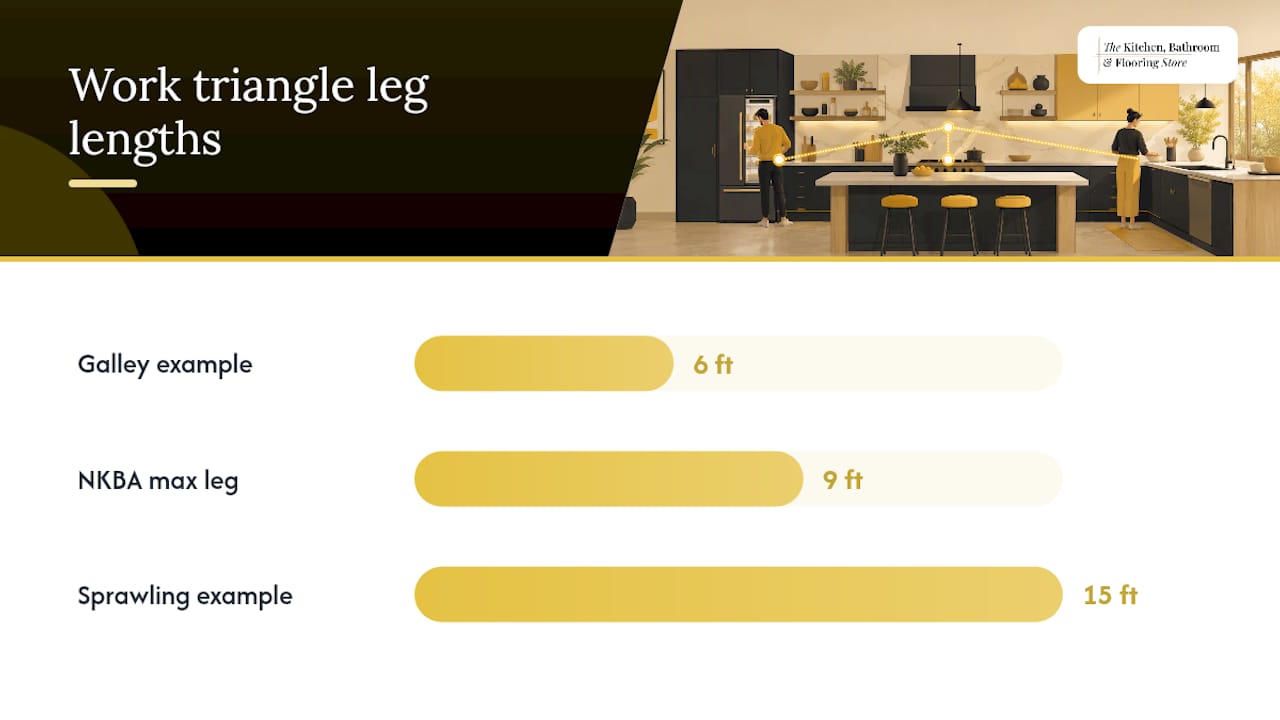
A galley kitchen with the sink and range on one run and the fridge on the opposite wall, six feet apart, sits comfortably inside those numbers. A sprawling kitchen where the fridge sits 15 feet from the range, with a full leg exceeding that 9 foot maximum, forces you to walk further for every single step of a recipe. That’s the kind of problem this measurement catches before the cabinets go in.
The work triangle traces back to Lillian Moller Gilbreth, an engineer and psychologist who applied motion-study techniques, the same methods used to speed up factory assembly lines, to the domestic kitchen during the 1920s and 1930s.
You can see her original model kitchens documented at the Smithsonian National Museum of American History, a genuinely fascinating look at how much rigor went into a concept that now gets summarized in one diagram.
The NKBA Access Standard is the closest thing the remodeling industry has to a rulebook for this concept, and it goes further than the basic triangle shape.
That 12 inch allowance matters more than it looks. It means a small island can sit inside your triangle without breaking the rule, but a large island that swallows a third of your walking path will. If your layout also needs to accommodate a wheelchair user or someone with limited mobility, treat these numbers as a floor, not a ceiling: wider landing spaces and lower obstruction tolerances make the same triangle far more usable for everyone in the house.
For anything beyond a simple remodel, especially if you’re moving plumbing or gas lines, it’s worth having a designer check these numbers against local code before demolition starts. Our space planning guide for kitchens walks through how that conversation typically goes.
Not entirely, but it’s no longer the whole story. Designer consensus, as reported by Better Homes & Gardens, holds that the triangle still earns its place in small and single-cook kitchens. Open-concept kitchens with multiple cooks, however, have outgrown a shape built for one person moving through a compact 1930s floor plan.
The alternative that’s replaced it in larger kitchens is zone planning: dividing the space into a prep zone, cooking zone, cleanup zone, storage zone, and often a beverage zone, each stocked with the tools that task needs. An island frequently becomes the hinge that ties those zones together, giving a second cook somewhere to work without crossing the primary triangle.
Newer layout patterns extend or replace the classic triangle entirely:
Pro Tip: If you regularly cook with a partner or a teenager who’s learning their way around the stove, a second sink solves more friction than almost any other single upgrade you could make.
The triangle behaves differently depending on your floor plan, and a few targeted fixes usually beat a full remodel.
Our guide to small kitchen design improvements covers several of these low-cost adjustments in more depth.
Most kitchen flow problems trace back to a handful of repeat offenders, and they’re easy to check for before demolition day.
The fixes worth prioritizing: dedicate real landing space next to every major appliance, keep the trash and recycling near the cleanup zone rather than across the room, and duplicate high-use endpoints (a second sink, an extra trash pull-out) wherever your budget allows.
Pro Tip: Before you sign off on a floor plan, physically walk the triangle in your current kitchen with a pot of water in hand. Every awkward pivot or squeeze-past moment tells you exactly what the new layout needs to fix.
A rolling cart or relocated small appliance can solve some of this today; moving plumbing or a load-bearing wall is a remodel-level decision. Our rundown of common kitchen layout mistakes breaks down several more, including a few that only show up once the cabinets are installed.
We’ve watched the shift from strict triangle thinking to zone-based planning play out in real remodels, not just design magazines, and it shows up in almost every project where more than one person cooks regularly.
If your kitchen’s layout has been fighting you for years, our single-contractor remodeling guide explains how we manage the whole process without bringing in outside contractors, and you can also browse open floor plan trends covered by One Day Doors & Closets if you’re weighing whether to open up your space at all. When you’re ready to talk specifics, our bathroom and kitchen remodeling packages are a good place to start a design consultation.
For the measurement standard itself, go straight to the NKBA Kitchen Planning Guidelines. For the history behind it, the Smithsonian’s profile of Lillian Gilbreth is worth the ten minutes it takes to read. For where design is heading next, Better Homes & Gardens covers the shift toward zone planning better than most trade publications.
The conventional advice on this topic treats the triangle like a law of physics. It isn’t. It’s a set of observations Lillian Gilbreth made about one cook moving through one small kitchen a century ago, later formalized into numbers by the NKBA. Those numbers are genuinely useful. Treating them as the only correct way to plan a kitchen is where people go wrong.
Here’s what I’d prioritize first: measure your existing kitchen against the NKBA figures before you assume you have a problem. Plenty of layouts that “feel” inefficient are actually within range; the real issue is usually a missing landing space or a blocked path, not the triangle itself. If you cook alone in a compact kitchen, the triangle will probably serve you fine for another hundred years.
Where the triangle genuinely falls short is the modern, multi-cook, open-plan kitchen it was never built for. If that’s your household, stop trying to force three points onto a space that needs five zones instead. Add the second sink. Build the beverage station. Let the island do the work Gilbreth never had to plan for.
— Anna